Thursday, March 27, 2014

Step By Step SQL Server Log Shipping

http://www.mssqltips.com/sqlservertip/2301/step-by-step-sql-server-log-shipping/

Problem
Setting up Log Shipping for SQL Server is not that difficult, but having a step by step process is helpful if this is the first time you have setup Log Shipping. In this tip we walk through the steps to setup Log Shipping.
Solution
Log Shipping is a basic level SQL Server high-availability technology that is part of SQL Server. It is an automated backup/restore process that allows you to create another copy of your database for failover.
Log shipping involves copying a database backup and subsequent transaction log backups from the primary (source) server and restoring the database and transaction log backups on one or more secondary (Stand By / Destination) servers. The Target Database is in a standby or no-recovery mode on the secondary server(s) which allows subsequent transaction logs to be backed up on the primary and shipped (or copied) to the secondary servers and then applied (restored) there.

Permissions

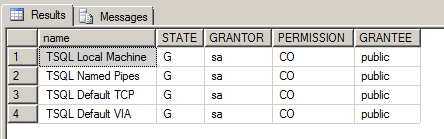
To setup a log-shipping you must have sysadmin rights on the server.

Minimum Requirements

  1. SQL Server 2005 or later
  2. Standard, Workgroup or Enterprise editions must be installed on all server instances involved in log shipping.
  3. The servers involved in log shipping should have the same case sensitivity settings.
  4. The database must use the full recovery or bulk-logged recovery model
  5. A shared folder for copying T-Log backup files
  6. SQL Server Agent Service must be configured properly
In addition, you should use the same version of SQL Server on both ends. It is possible to Log Ship from SQL 2005 to SQL 2008, but you can not do it the opposite way. Also, since Log Shipping will be primarly used for failover if you have the same versions on each end and there is a need to failover you at least know you are running the same version of SQL Server.

Steps to Configure Log-Shipping:

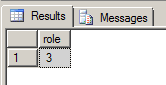
1. Make sure your database is in full or bulk-logged recovery model. You can change the database recovery model using the below query. You can check the database recovery model by querying sys.databases 
SELECT name, recovery_model_desc FROM sys.databases WHERE name = 'jugal'

USE [master]
GO
ALTER DATABASE [jugal] SET RECOVERY FULL WITH NO_WAIT
GO
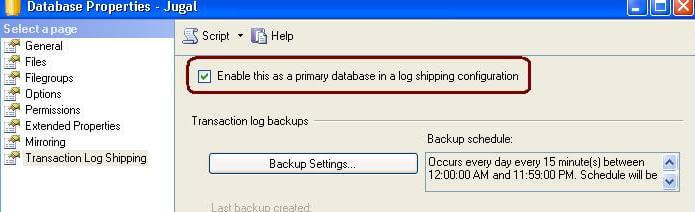
2. On the primary server, right click on the database in SSMS and select Properties. Then select the Transaction Log Shipping Page. Check the "Enable this as primary database in a log shipping configuration" check box.
setting up log shipping for sql server
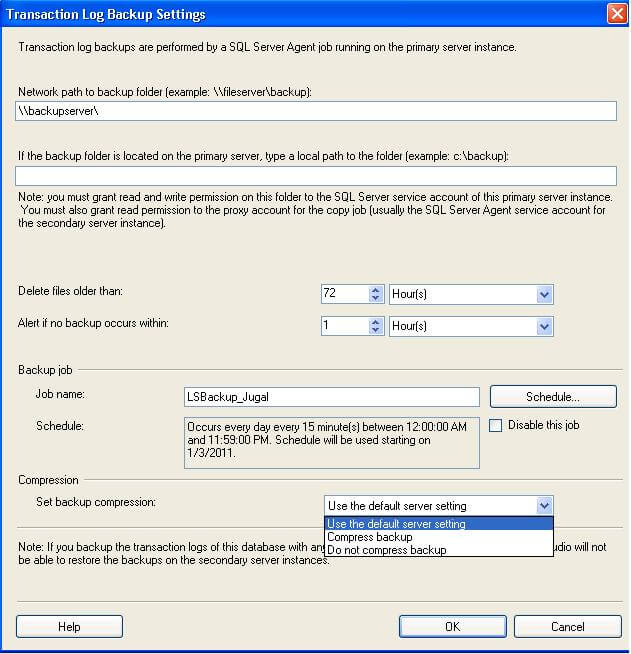
3. The next step is to configure and schedule a transaction log backup. Click on Backup Settings... to do this.
right click on the database in ssms
If you are creating backups on a network share enter the network path or for the local machine you can specify the local folder path. The backup compression feature was introduced in SQL Server 2008 Enterprise edition. While configuring log shipping, we can control the backup compression behavior of log backups by specifying the compression option. When this step is completed it will create the backup job on the Primary Server.
transaction log backup settings in ssms
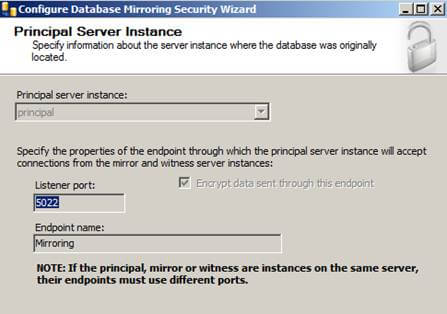
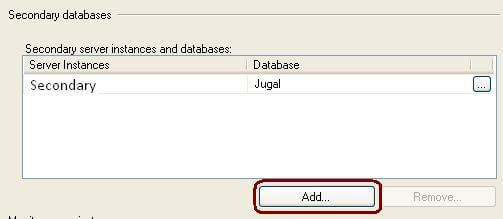
4. In this step we will configure the secondary instance and database. Click on the Add... button to configure the Secondary Server instance and database. You can add multiple servers if you want to setup one to many server log-shipping.
add a secondary server
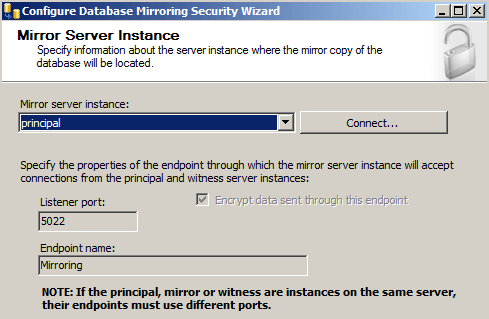
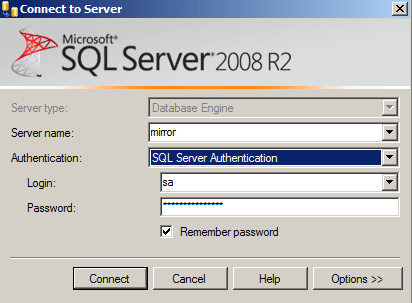
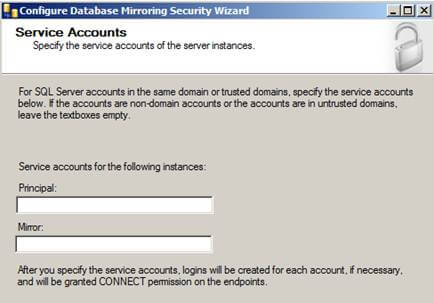
When you click the Add... button it will take you to the below screen where you have to configure the Secondary Server and database. Click on the Connect... button to connect to the secondary server. Once you connect to the secondary server you can access the three tabs as shown below.

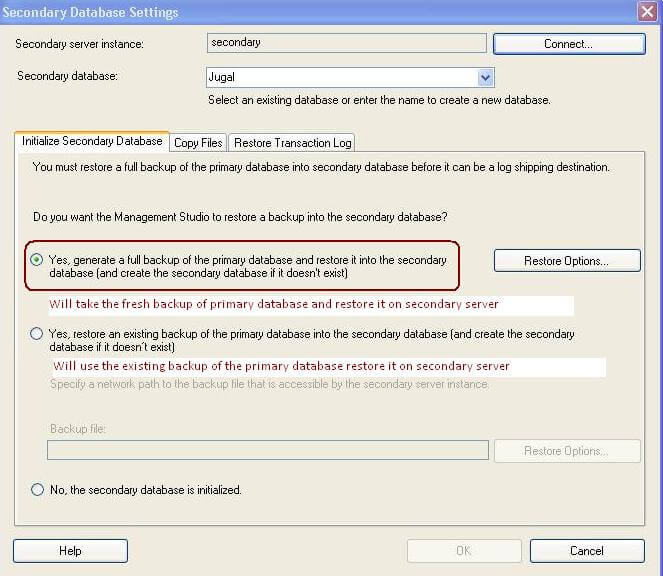
Initialize Secondary Database tab

In this step you can specify how to create the data on the secondary server. You have three options: create a backup and restore it, use an existing backup and restore or do nothing because you have manually restored the database and have put it into the correct state to receive additional backups.
intialize secondary database

Copy Files Tab

In this tab you have to specify the path of the Destination Shared Folder where the Log Shipping Copy job will copy the T-Log backup files. This step will create the Copy job on the secondary server.
specify where the log shipping copy job will copy the t-log backup files

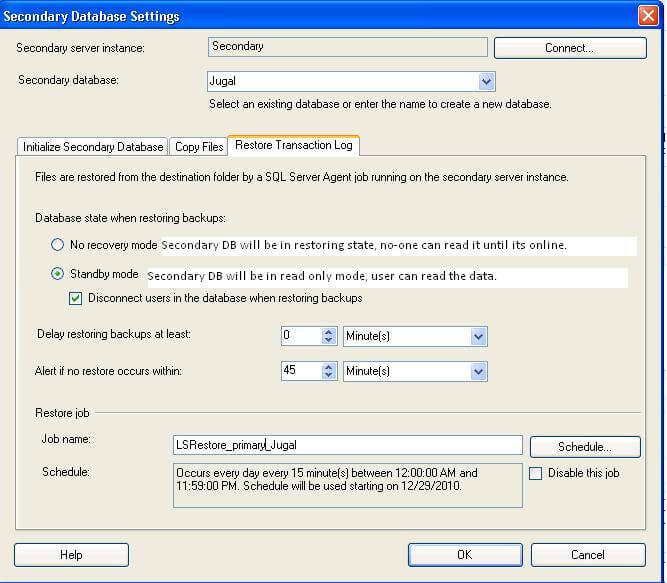
Restore Transaction Log Tab

Here you have to specify the database restoring state information and restore schedule. This will create the restore job on the secondary server.
create the restore on the secondary server
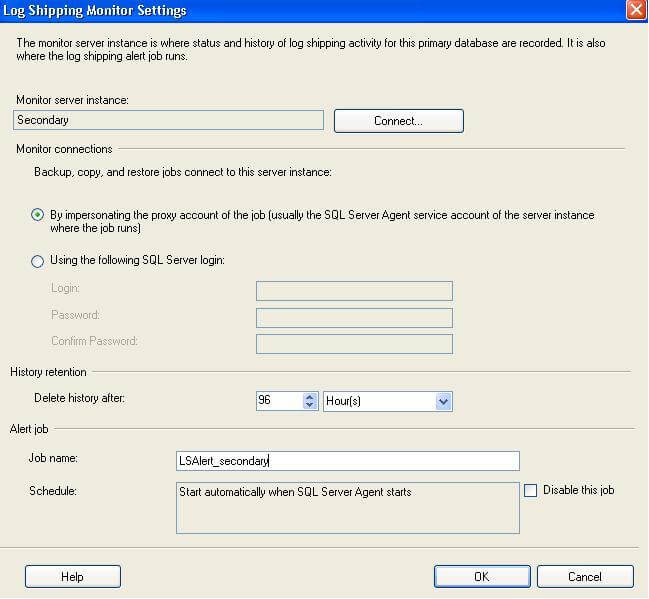
5. In this step we will configure Log Shipping Monitoring which will notify us in case of any failure. Please note Log Shipping monitoring configuration is optional.
log shipping monitoring will notify us in case of any faulures
Click on Settings... button which will take you to the "Log Shipping Monitor Settings" screen. Click on Connect ...button to setup a monitor server. Monitoring can be done from the source server, target server or a separate SQL Server instance. We can configure alerts on source / destination server if respective jobs fail. Lastly we can also configure how long job history records are retained in the MSDB database. Please note that you cannot add a monitor instance once log shipping is configured.
monitoring can be done from the source server, target server or a separate SQL Server instance.
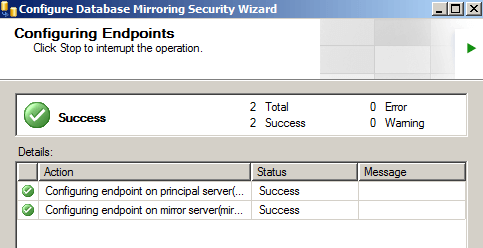
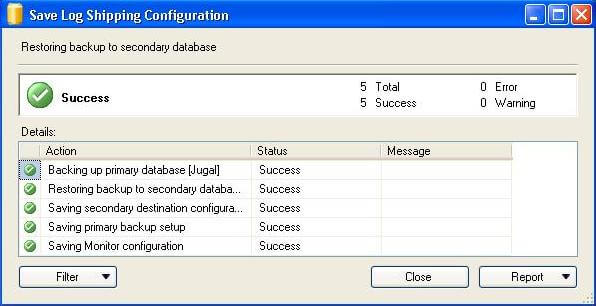
6. Click on the OK button to finish the Log Shipping configuration and it will show you the below screen.
Next Steps
  • As Log Shipping does not support automatic failover, plan for some down time and a manual failover
  • Once you failover, check for Orphan Users and fix as needed
  • For VLDBs it is recommended that you manually restore the database instead of using the wizard to create the full backup.

To Remove Log Shipping

  1. On the log shipping primary server, execute sp_delete_log_shipping_primary_secondary to delete the information about the secondary database from the primary server.
  2. On the log shipping secondary server, execute sp_delete_log_shipping_secondary_database to delete the secondary database.
    Note Note
    If there are no other secondary databases with the same secondary ID,sp_delete_log_shipping_secondary_primary is invoked fromsp_delete_log_shipping_secondary_database and deletes the entry for the secondary ID and the copy and restore jobs.
  3. On the log shipping primary server, execute sp_delete_log_shipping_primary_database to delete information about the log shipping configuration from the primary server. This also deletes the backup job.
  4. On the log shipping primary server, disable the backup job. For more information, see Disable or Enable a Job.
  5. On the log shipping secondary server, disable the copy and restore jobs.
  6. Optionally, if you are no longer using the log shipping secondary database, you can delete it from the secondary server.

Difference between LOG SHIPPING VS. MIRRORING VS. REPLICATION

LOG SHIPPING VS. MIRRORING VS. REPLICATION


Log Shipping::


It automatically sends transaction log backups from one database (Known as the primary database) to a database (Known as the Secondary database) on another server. An optional third server, known as the monitor server, records the history and status of backup and restore operations. The monitor server can raise alerts if these operations fail to occur as scheduled. 

Mirroring::

Database mirroring is a primarily software solution for increasing database availability.
It maintains two copies of a single database that must reside on different server instances of SQL Server Database Engine.

Replication::

It is a set of technologies for copying and distributing data and database objects from one database to another and then synchronizing between databases to maintain consistency. Using replication, you can distribute data to different locations and to remote or mobile users over local and wide area networks, dial-up connections, wireless connections, and the Internet.
Components

Log Shipping::Primary server, secondary server and monitor server (Optional).
Mirroring::Principal server, mirror server, and witness server (Optional).
Replication::Publisher, Subscribers, Distributor (Optional).
Data Transfer

Log Shipping::T-Logs are backed up and transferred to secondary server.
Mirroring::Individual T-Log records are transferred using TCP endpoints.
Replication::Replication works by tracking/detecting changes (either by triggers or by scanning the log) and shipping the changes.
Server Limitation

Log Shipping::It can be configured as One to Many. i.e one primary server and many secondary servers. Or
Secondary server can contain multiple Primary databases that are log shipped from multiple servers.
Mirroring::It is one to one. i.e. One principal server to one mirror server.
Replication::
  • Central publisher/distributor, multiple subscribers.
  • Central Distributor, multiple publishers, multiple subscribers.
  • Central Distributer, multiple publishers, single subscriber.
  • Mixed Topology.
Types Of Failover

Log Shipping::Manual.
Mirroring::Automatic or manual.
Replication::Manual.
DB Access

Log Shipping::You can use a secondary database for reporting purposes when the secondary database restore in STANDBY mode.
Mirroring::Mirrored DB can only be accessed using snapshot DB.
Replication::The Subscriber Database is open to reads and writes.
Recovery Model

Log Shipping::Log shipping supports both Bulk Logged Recovery Model and Full Recovery Model.
Mirroring::Mirroring supports only Full Recovery model.
Replication::It supports Full Recovery model.
Restoring State

Log Shipping::The restore can be completed using either the NORECOVERY or STANDBY option.
Mirroring::The restore can be completed using with NORECOVERY.
Replication::The restore can be completed using With RECOVERY.
Backup/Restore

Log Shipping::This can be done manually or
through Log Shipping options.
Mirroring::User make backup & Restore manually.
Replication::User create an empty database with the same name.
Monitor/
Distributer/ Witness

Log Shipping::The monitor server should be on a server separate from the primary or secondary servers to avoid losing critical information and disrupting monitoring if the primary or secondary server is lost. . If a monitor server is not used, alert jobs are created locally on the primary server instance and each secondary server instance.
Mirroring::Principal server can’t act as both principal server and witness server.
Replication::Publisher can be also distributer.
Types Of Servers

Log Shipping::All servers should be SQL Server.
Mirroring::All servers should be SQL Server.
Replication::Publisher can be ORACLE Server.
SQL Server Agent Dependency/Jobs

Log Shipping::Yes. Log shipping involves four jobs, which are handled by dedicated SQL Server Agent jobs. These jobs include the backup job, copy job, restore job, and alert job.
Mirroring::Independent on SQL Server agent.
Replication::Yes. Snapshot agent, log reader agent & Distribution agent (transactional replication)
Merge agent (merge replication).
Requirements

Log Shipping::
  • The servers involved in log shipping should have the same logical design and collation setting.
  • The databases in a log shipping configuration must use the full recovery model or bulk-logged recovery model.
  • The SQL server agent should be configured to start up automatically.
  • You must have sysadmin privileges on each computer running SQL server to configure log shipping.
Mirroring::
  • Verify that there are no differences in system collation settings between the principal and mirror servers.
  • Verify that the local windows groups and SQL Server logins definitions are the same on both servers.
  • Verify that external software components are installed on both the principal and the mirror servers.
  • Verify that the SQL Server software version is the same on both servers.
  • Verify that global assemblies are deployed on both the principal and mirror server.
  • Verify that for the certificates and keys used to access external resources, authentication and encryption match on the principal and mirror server.
Replication::
  • Verify that there are no differences in system collation settings between the servers.
  • Verify that the local windows groups and SQL Server Login definitions are the same on both servers.
  • Verify that external software components are installed on both servers.
  • Verify that CLR assemblies deployed on the publisher are also deployed on the subscriber.
  • Verify that SQL agent jobs and alerts are present on the subscriber server, if these are required.
  • Verify that for the certificates and keys used to access external resources, authentication and encryption match on the publisher and subscriber server.
Using With Other Features Or Components

Log Shipping::Log shipping can be used with Database mirroring, Replication.
Mirroring::Database mirroring can be used with
Log shipping, Database snapshots , Replication.
Replication::Replication can be used with log shipping, database mirroring.
DDL Operations

Log Shipping::DDL changes are applied automatically.
Mirroring::DDL changes are applied automatically.
Replication::only DML changes to the tables you have published will be replicated.
Database Limit

Log Shipping::No limit.
Mirroring::generally good to have 10 DB’s for one server.
Replication::No limit.
latency

Log Shipping::There will be data transfer latency. >1min.
Mirroring::There will not be data transfer latency.
Replication::Potentially as low as a few seconds.
Committed /
Uncommitted
Transactions

Log Shipping::Both committed and uncommitted transactions are transferred to the secondary database.
Mirroring::Only committed transactions are transferred to the mirror database.
Replication::Only committed transactions are transferred to the subscriber database.
Primary key

Log Shipping::Not required.
Mirroring::Not required.
Replication::All replicated table should have Primary Key.
New Created Database&
Stored Procedure

Log Shipping::Monitoring and history information is stored in tables in msdb, which can be accessed using log shipping stored procedures.
Replication::Creates new SPs ( 3 Sps of one table).
Distribution Database.
Rowguid column will be created.
Individual Articles

Log Shipping::No. Whole database must be selected.
Mirroring::No. Whole database must be selected.
Replication::Yes. Including tables, views, stored procedures, and other objects. Also filter can be used to restrict the columns and rows of the data sent to subscribers.
FILESTREAM

Log Shipping::Log shipping supports FILESTREAM.
Mirroring::Mirroring does not support FILESTREAM.
Replication::Replication supports FILESTREAM.
DB Name

Log Shipping::The secondary database can be either the same name as primary database or it may be another name.
Mirroring::It must be the same name.
Replication::It must be the same name.
DB Availability

Log Shipping::In case of standby mode: read only database.
In case of restoring with no recovery: Restoring state.
Mirroring::In Recovery state, no user can make any operation.
You can take snapshot.
Replication::Snapshot (read-only).
Other types (Database are available).
Warm/ Hot Standby Solution

Log Shipping::It provides a warm standby solution that has multiple copies of a database and require a manual failover.
Mirroring::When a database mirroring session is synchronized, database mirroring provides a hot standby server that supports rapid failover without a loss of data from committed transactions. When the session is not synchronized, the mirror server is typically available as a warm standby server (with possible data loss).
Replication::It provides a warm standby solution that has multiple copies of a database and require a manual failover.
System Data Transferred

Log Shipping::Mostly.
Mirroring::Yes.
Replication::No.
System Databases

Mirroring::You cannot mirror the Master, msdb, tempdb, or model databases.
Mode Or Types

Log Shipping::
  • Standby mode (read-only)-you can disconnect users when restoring backups .
  • No recovery mode (restoring state)-user cannot access the secondary database.
Mirroring::
  • high-safety mode supports synchronous operation.
  • high-performance mode, runs asynchronously.
  • High-safety mode with automatic failover.
Replication::
  • Snapshot replication.
  • Transactional replication.
  • Transactional publication with updatable subscriptions.
  • Merge publication.
  • Pull/Push subscription.

Difference between SQL Server 2012 AlwaysOn vs. Database Mirroring

http://sqlmag.com/sql-server-2012/sql-server-2012-alwayson-vs-database-mirroring

Probably the most anticipated new feature in the SQL Server 2012 (formerly code-named Denali) release is thenew AlwaysOn Availability Groups high-availability feature. Earlier versions of SQL Server provided Windows Failover Clustering (WSFC), designed for server-level protection, and database mirroring, designed for database-level protection. AlwaysOn is essentially the next evolution of database mirroring. Let’s see how it stacks up against the tried-and-true SQL Server database mirroring high-availability feature.

Clustering Required vs. Witness Required

First, for the bad news: AlwaysOn requires a WSFC failover cluster, which means you have to run SQL Server Denali on Windows Server 2008 Enterprise Edition or later, adding additional complexity.

However, WSFC is easier to set up with Windows Server 2008. Database mirroring doesn’t require WSFC, but if you want to use it in High Safety mode for automatic failover, then you need to use a third SQL Server system as a witness to which database is available and which has failed.

Up to 4 Replicas vs. 1 Mirror

One of the main advantages that AlwaysOn has over database mirroring is that it permits up to four replicas for protected databases. Predictably, each replica is located on a separate SQL Server instance. With database mirroring, although it’s possible to mirror different databases to different mirror servers, each mirrored database is limited to a single mirror partner system.

Multiple Database Failover vs. Single Database Failover

Another limitation of database mirroring is that it fails over just one database at a time, but in many cases you might want to fail related databases simultaneously as a group. In addition, server-level objects such as logins aren’t part of the database. With mirroring you must manually create those objects on the mirror server. AlwaysOn can combine multiple databases as a unit that can be failed over together. This is called the Availability Group.

Mixed Synchronous and Asynchronous Connections vs. Synchronous or Asynchronous Connections

With database mirroring, you could do asynchronous (High Performance) or synchronous (High Safety) but not both. Essentially you had to choose between using database mirroring for disaster recovery (asynchronous) or for high availability(synchronous). AlwaysOn, however, allows up to two synchronous replicas and two asynchronous replicas to be simultaneously active.

Read-only Replica Databases vs. In-Recovery Mirrored Databases

Finally, with database mirroring, the mirror database is always in a state of recovery, which essentially means it can’t be used while mirroring is active. You can create a snapshot of the mirror database to use for reporting, but the snapshot is a point-in-time copy. With AlwaysOn, the replica databases provide read-only access to use for reporting and backup purposes, offloading some of the workload from the primary server.

Configure SQL Server Database Mirroring Using SSMS

http://www.mssqltips.com/sqlservertip/2464/configure-sql-server-database-mirroring-using-ssms/

Problem
I have a need to setup SQL Server Database Mirroring in my environment.  I understand it can be complicated to setup. Can you provide an example on setting up SQL Server Database Mirroring?  Check out this tip for a basic look at how to setup this SQL Server feature.
Solution
In this tip I am going to outline my environment and then walk through the process of setting up Database Mirroring.  This will include the configurations, backups, restores and verification process.  Let's jump in.
My test environment consists of two separate VM's running VM Workstation with Windows 2008 R2 Datacenter Edition and SQL Server 2008 R2 Enterprise named appropriately Principal and Mirror. The SQL Server and SQL Server Agent Services accounts are running as domain users (DOMAIN\User). Windows Firewall is OFF for the sake of this example.
I created a database on the Principal SQL Server instance and named it TestMirror. The recovery model is set to FULL RECOVERY.
Mirror1
BACKUP DATABASE TestMirror TO DISK = 'C:\Program Files\Microsoft SQL 
Server\MSSQL10_50.MSSQLSERVER\MSSQL\Backup\Backup.bak';
BACKUP LOG TestMirror TO DISK = 'C:\Program Files\Microsoft SQL 
Server\MSSQL10_50.MSSQLSERVER\MSSQL\Backup\Backup.trn'; 

Below are the two files in the file system:
Mirror2
3rd step: Assuming you have the backup folder shared on the Principal Server and you can access it from the Mirror Server, you will need to restore the full backup to the Mirror server with the NORECOVERY option.
RESTORE DATABASE TestMirror FROM DISK = N'\\Principal\Backup\Backup.bak' 
WITH FILE = 1, MOVE N'TestMirror_log' TO 
N'C:\Program Files\Microsoft SQL Server\MSSQL10_50.MSSQLSERVER\MSSQL\DATA\TestMirror_1.ldf', 
NORECOVERY, NOUNLOAD, STATS = 10;
RESTORE LOG TestMirror FROM DISK = N'\\Principal\Backup\Backup.trn' 
WITH  FILE = 1, NORECOVERY, NOUNLOAD, STATS = 10;

Mirror3
Now it's time to dig down and configure Database Mirroring. From the Principal server, right click the database and choose "Tasks" | "Mirror" or choose "Properties" | "Mirroring".
Mirror4
Click the "Configure Security" button and click "Next >" if the Configure Database Mirroring Security Wizard intro screen appears. The next screen should be the Include Witness Server screen:
Mirror5
This is where you would configure a witness server for your mirroring, but since we're just configuring a basic mirror we will skip this part. However, if you are configuring mirroring in an Enterprise environment it is recommended you configure a witness server because without one you will not have synchronous automatic failover option.
Select "No", then click "Next >" to continue the process.
The next screen will give you options to configure the Principal Server Instance:
Mirror6
Here we will be creating our endpoint, which is a SQL Server object that allows SQL Server to communicate over the network. We will name it Mirroring with a Listener Port of 5022.
Click the "Next >" button to continue.
The next screen will give you options to configure the Mirror Server Instance:
Mirror7
To connect to the Mirror server instance we will need to click the "Connect..." button then select the mirror server and provide the correct credentials:
Mirror8
Once connected, we also notice our endpoint name is Mirroring and we are listening on port 5022.
Click "Next >" and you'll see the Service Accounts screen.
Mirror9
When using Windows Authentication, if the server instances use different accounts, specify the service accounts for SQL Server. These service accounts must all be domain accounts (in the same or trusted domains).
If all the server instances use the same domain account or use certificate-based authentication, leave the fields blank.
Since my service accounts are using the same domain account, I'll leave this blank.
Click "Finish" and you'll see a Complete the Wizard screen that summarizes what we just configured. Click "Finish" one more time.
Mirror10
If you see the big green check mark that means Database Mirroring has been configured correctly. However, just because it is configured correctly doesn't mean that database mirroring is going to start...
Next screen that pops up should be the Start/Do Not Start Mirroring screen:
Mirror11
We're going to click Do Not Start Mirroring just so we can look at the Operating Modes we can use:
Mirror12
Since we didn't specify a witness server we will not get the High Safety with automatic failover option, but we still get the High Performance and High Safety without automatic failover options.
For this example, we'll stick with synchronous high safety without automatic failover so changes on both servers will be synchronized.
Next, click "Start Mirroring" as shown below.
Mirror13
If everything turned out right, Database Mirroring has been started successfully and we are fully synchronized.
Mirror14
Mirror15 Mirror16
If Database mirroring did not start successfully or you received an error here are a few scripts to troubleshoot the situation:
Both servers should be listening on the same port. To verify this, run the following command:
SELECT type_desc, port 
FROM sys.tcp_endpoints;
We are listening on port 5022. This should be the same on the Principal and Mirror servers:
Mirror17
Database mirroring should be started on both servers. To verify this, run the following command:
SELECT state_desc
FROM sys.database_mirroring_endpoints;
The state_desc column on both the Principal and Mirror server should be started:
Mirror18
To start an Endpoint, run the following:
ALTER ENDPOINT <Endpoint Name>
STATE = STARTED 
AS TCP (LISTENER_PORT = <port number>)
FOR database_mirroring (ROLE = ALL);
ROLES should be the same on both the Principal and Mirror Server, to verify this run:
SELECT role 
FROM sys.database_mirroring_endpoints;

Mirror19
To verify the login from the other server has CONNECT permissions run the following:
SELECT EP.name, SP.STATE,
CONVERT(nvarchar(38), suser_name(SP.grantor_principal_id))
AS GRANTOR,
SP.TYPE AS PERMISSION,
CONVERT(nvarchar(46),suser_name(SP.grantee_principal_id))
AS GRANTEE
FROM sys.server_permissions  SP , sys.endpoints EP
WHERE SP.major_id  = EP.endpoint_id
ORDER BY  Permission,grantor, grantee;

Mirror20
You can see here from the State and Permissions column that the user has been Granted Connect permissions.
Next Steps
  • To learn more about the three different operating modes involved in database mirroring check out this previous tip
  • Before implementing database mirroring make sure this is the high availability option you need for you company. Log shippingreplication, and clustering are also high availability options that may bring more benefit than mirroring depending on the needs.
  • Check out all of the Database Mirroring tips.

Installing SQL Server 2012 in a Mirror Setup

http://blog.strobaek.org/2013/05/02/installing-sql-server-2012-in-a-mirror-setup/

In my series on creating a SharePoint farm in Windows Azure we last time created the virtual machines for the two front-end servers, the two application servers and the three servers to be used by SQL Server.
In this sixth post we will look at how to enable SQL Server for high availability by enabling them in a mirror setup.
First of all, this is not really directly related to Windows Azure. The steps taken are the same as you would, should you enable a mirror on-premises, but as it is not something you do every day – at least I don’t – I thought it might be of interest.
Due to several factors, the structure on the underlying storage in Windows Azure being one of them, you cannot run a SQL Server Cluster in Windows Azure, so if you require redundancy and fast failover, you need something else, like a mirror.
There are two modes of database mirroring – synchronous and asynchronous. With synchronous mirroring, transactions cannot commit on the principal until all transaction log records have been successfully copied to the mirror (but not necessarily replayed yet). This guarantees that if a failure occurs on the principal and the principal am mirror are synchronized, committed transactions are present in the mirror when it comes online – in other words, it is possible to achieve zero data loss.
Synchronous mirroring can be configured to provide automatic failover, through the use of a third SQL Server instance called the witness server (usually hosted on another physically separate server). The sole purpose of the witness is to agree (or not) with the mirror that the principal cannot be contacted. If the witness and mirror agree, that mirror can initiate failover automatically. If synchronous mirroring is configured with a witness, the operating mode is known as high-availability mode and povides a hot standby solution. When no witness is defined, the operating mode is known as high-safety mode, which provides a warm standby solution.
With asynchronous mirroring there is no such guarantee, because transactions can commit on the principal without having to wait for database mirroring to copy all the transaction’s log records. This configuration can offer higher performance because transactions do not have to wait, and it is often used when the principal and mirror servers are separated by large distances (that is, implying a large network latency and possible lower network bandwidth). Consequently, the operating mode is also known as high-performance mode and provides a warm standby solution.
If a failure occurs on the principal, a mirroring failover occurs, either manually (in the high-performance and high-safety modes) or automatically (only in the high-availability mode). The mirror database is brought online after all the transaction log records have been replayed (that is, after recovery has completed). The mirror becomes the new principal and the applications can reconnect to it. The amount of downtime required depends on how long it takes for the failure to be detected and how much transaction log needs to be replayed before the mirror database can be brought online.
In the previous post on the subject we created three VMs and attached an extra disk. As was the case for the two domain controllers, you need to log on to the SQL Servers and attach the disk.
Before we begin I must make a comment about the screen shots. If some of the text is missing it is because I have removed it due to confidentiality related issues. I apologize.
First task is to install .NET 3.51. If this is not done the installation of SQL Server might hang. We do this by using Add Feature.
Open the Server Manager and select Manage and then Add Roles and Features.
image
The Add Roles and Features Wizard will be displayed
image
Click Next.
In the Select installation type dialog ensure the correct option is selected.
image
Click Next.
Select the server in the Select destination server dialog. Then click Next.
image
Select the feature (.NET Framework 3.5 Features)
image

image
Click Next.
You get a change to confirm the selections.
image
If you are satisfied click Install.
The installation will now begin. You can either Close the dialog right away or you can wait until the installation has completed.
image
We are now ready with the actual installation of SQL Server.
Download and attach media (here SQL Server 2012 SP1 Enterprise Edition)
image
Run the Setup.exe file.
Select Installation in the menu to the left.
image
On the installation page, select the New SQL Server stand-alone installation.
image
This will install the setup support files. Once that is done, click OK.
image
Accept the suggested product key or enter the correct one.
image
Click Next.
In the License Terms dialog accept the terms and click Next.
image
Ensure that all is green in the Setup Support Rules dialog. If the Windows Firewall rule is yellow it is most likely because port 1433 is not open. It will have no influence on the installation, but may be an issue later on.
Click Next.
image
In the dialog for Setup Role select the top option (SQL Server Feature Installation)
image
Click Next.
On the dialog for the Feature Selection select the required features. In my case I did not require Analysis Services nor Reporting Services, but I did select to install the management tools.
image
Click Next.
The setup process will now determine if any process will be blocked. If all is green click Next.
image
Accept the default setting for the instance configuration.
imageAcc
Click Next.
You should have enough space for the installation of the actual bits.
image
Click Next.
If you have installed SQL Server 2008 and R2 you will notice that the default values for theServer Configuration has changed.
You can keep the default settings, but if you plan to use this server in a mirror setup – which is the subject of this blog post – I will recommend that you use a domain account. It will make setting up the security during the mirror configuration so much easier. The reason being that the local account on Server 1 does not know anything about the local account on Server 2.
image
If you just keep the default values you can always change them later using the SQL Server Configuration Manager.
Click Next.
In the Database Engine Configuration dialog on the Server Configuration tab keep the default value for the Authentication Mode.
image
Select the Data Directories tab.
Change the Data root directory to the additional disk we attached. Again, if this had been a production setup, you would spread your directories over a lot more drives.
image
Select the FILESTREAM tab.
You want to select both the Enable FILESTREAM for Transact-SQL access and the Enable FILESTREAM for file I/O access options. You don’t need to enable the last one.
image
Click Next.
image
In the Error Reporting option, click Next
Setup will run some additional checks. If all is green in the Installation Configuration Rules clickNext.
image
Click Install.
image
The installation will begin and it is time to go and get a cup of coffee.
If all goes as expected, you should have a lot of green markers and you can close the dialog and exit the setup.
image
One down and two more to go. Repeat the above process for the other two SQL Servers. Once all are installed we will have the primary, mirror partner and witness servers and we are ready to enable the mirror.
However, before actually do this, we need to install SharePoint. The reason is that the mirror is enabled by backing up and restoring databases, hence we need something “in” SQL so to speak. As I am not a SharePoint person, I will refrain from trying to describe the process.
Therefore:
And we have a working SharePoint installed in to the primary SQL Server (in this case SP-SQL1).
First step is to ensure that all SQL logins are present on the primary and mirror server.
Then we must ensure that all databases are running with recovery mode set to full. RDP into SP-SQL1 (the primary) and open op SQL Server Management Studio.
Ensure there are no data connections to the SQL Server (you may want to close down the SP site).
Execute the following T-SQL to set recovery mode:
USE master;
GO
ALTER DATABASE AdminContent SET RECOVERY FULL;
We then first backup the database
USE master;
GO
BACKUP DATABASE AdminContent
TO DISK = ‘F:\BackUp\AdminContent.bak’
WITH FORMAT
GO
and afterwards the log:
USE master;
GO
BACKUP LOG AdminContent
TO DISK = ‘F:\BackUp\AdminContent_log.bak’
GO
Copy the files to the mirror partner (SP-SQL2). Ensure they are placed in the same location, e.g. F:\BackUp in the above example. It is not a requirement, but the syntax of the T-SQL is slightly different if the location is different.
Connect to the mirror partner (SP-SQL2) from the open Management Studio or RDP into the server and open SSMS from here.
First we restore the database
USE master;
GO
RESTORE DATABASE AdminContent
FROM DISK = ‘F:\BackUp\AdminContent.bak’
WITH NORECOVERY
GO
and then the log
USE master;
GO
RESTORE LOG AdminContent
FROM DISK = ‘F:\BackUp\AdminContent_log.bak’
WITH FILE=1, NORECOVERY
GO
We are now ready to enable mirroring. In SSMS right click on one of the databases and selectTasks and then Mirrror….
image
In the Database Properties dialog, click Configure Security.
image
The first step in the configuration wizard is to decide whether or not a witness server should be used. As want automatic failover, I select the Yes option and click Next.
image
In the dialog to choose what servers to configure, ensure that all three are selected.
image
Click Next.
During the configuration you will have to connect to each SQL Server.
As I was working from SP-SQL1 and this is going to by my Principal server I am already logged in and can just click Next.
image
Next select the Mirror server. This is going to be SP-SQL2. Click Connect and enter your credentials. When done click Next.
image
Repeat the steps for the Witness server.
image
Click Next.
You now have to set up the Service Accounts information. If you your SQL Servers are running under a domain account this is going to be easy. If not you will afterwards have to enable the local accounts on each server. Doable, but a lot more hassle.
Enter the required information for each server.
image
Click Next.
You have made it to the end of the wizard and can review the information.
image
Click Danish. Sorry Finish. Bad joke.
If all goes well you should see something like the figure below. Click Close to close the dialog.
image
When you close the dialog you can either start the mirror right away or you can do so later.
I just hit the Start Mirroring button.
image
If the mirror process is able to start you will return to the initial dialog and the status should be Synchronizing.
image
Looking in SSMS at the databases you can also see that mirroring has been set up and is active.
image
This was a really long post for which I apologize.
There is a lot more to SQL Server mirroring than the above, but I hope it will serve as an introduction and maybe enable people not working with SQL on a daily basis to get up and running more quickly.